

Table of Contents
Overview
What is CGCircuit?
CGCircuit is a web platform that allows artists, designer, programmers, photographers and directors to market their knowledge by creating video tutorials and sell them across the globe.
With CGCircuit CG and Traditional Artists alike have a place to learn as well as share their knowledge with their peers. We facilitate and incentivize instructors to sell their self created tutorials for a price of their choosing.
Contributing instructors not only receive the revenue from their sold tutorials, they receive increased exposure among their peers. The community of users can then purchase and watch these lessons making them part of their learning library.
CGCircuit, YouTube and Vimeo
We get asked sometimes what is the difference between YouTube or Vimeo and CGCircuit.
The only thing CGCircuit and services like YouTube and Vimeo have in common is the fact that they play video.
CGCircuit is a service that allows people to sell their instructional content and it caters to the animation, games, VFX and web development sectors only.
Learning
Learning on CGCircuit
Learning on CGCircuit is easy. Once you purchase a tutorial, you have the ability to watch it as many times as you like, for as long as your CGCircuit login is active.
After you purchase a tutorial, it is available under the “MY COURSES” tab. If the tutorial has any accompanying example files, you will have access to any example files once you purchase. Example files will be found on the tutorial detail page.
To protect the hard work your peers and colleagues have put into creating their tutorials, videos cannot be downloaded. This is to prevent piracy. Not that we think you would do such a thing, it’s more for that other guy.
CGCircuit Video Player
The video player has been created with tools and settings to provide you the optimal learning experience.
- It opens in a separate window so you can scale it and play along side the application you are using.
- It will automatically adjust display quality based on your connection speed.
- Favorite videos for convenient playback.
- Convenientely rewind in order to quickly watch again the last 30 seconds.
- Add Notes to the video’s timeline to go back to a specific part of the video later.
Managing your Content
Subjects
As you learn a new topic, you can categorize every tutorial the way that works best for you. For example is a tutorial is very helpful for you to learn about “How to use Python in Houdini” because the tutorial has a section of it that was very helpful for you to learn that topic, you can create a “Python in Houdini” subject and add that tutorial to it. If the same tutorial has some good information that helps you learn the basics of Houdini (for example), you can create another subject “Getting started with Houdini” and add the same tutorial to is.
Yes, you can add the same tutorial to as many subjects as you’d like.
Notes
As you watch a video in our player, and you find part of the video especially helpful for you, you can bookmark that specific part of the video with a Note. A Note allows you not only to bookmark a specific time, but also to specify the reason why that part of the video is so helpful, or maybe you can write down an idea you want to remember later.
The more Notes you save, the more information you leave for your “future self” to use as reminders or refreshers for on what you learned.
Selling on CGCircuit
Overview
Selling on CGCircuit is easy and free. You can create content exclusively for CGCircuit, or if you already have content selling on other platforms, you can port it to CGCircuit to get the benefit of being part of a large and growing CG community.
As a content creator, you have complete creative freedom to choose the topics you want to tackle, the product you want to create, and to set your own prices. However, please be aware that CGCircuit reserves the right to remove any content that is deemed inappropriate and to determine what constitutes inappropriate content.
Note on Digital Assets
As a new creator, your products will be reviewed by CGCircuit before publication. Subsequent submissions will be instantly published.
In order to maintain the highest level of quality for your content and your profile on our platform, please follow these guidelines.
Getting paid
In order to get paid, creators must follow the procedure below, which will setup an easy and secure method to receive payment from CGCircuit.
CGCircuit uses Stripe as a payment platform to pay creators. Here is how you set it up:
Payment Setup (Stripe Express account setup)
- Make sure you are logged in to CGCircuit.
- Click on your name on the top right corner of the header, then click on “My Account”. This will bring you to your account settings.
- When the page loads, click on the “Main Info” tab in the Author Setting section of the left menu.
- At the very top of that page you will see a “Setup Payments” button.
- Click on the Setup Payments button to start the process.
After you click on the Setup button you will be redirected to Stripe to create an Express account. After you finish this guided setup, you will be redirected to CGCircuit.
Please note: When you are redirected to CGCircuit, please pay attention to the message next to the “Edit” button. This icon will tell you whether you still need to provide more information to Stripe before you can receive the payment.
Make sure to check your email; Stripe should have sent you a message to confirm your account creation.
You can login to your Stripe Express account in different ways:
You can use Stripe Express to manage and download tax forms, track payments in real time, see upcoming payouts, and understand key cash flow trends. Take a look at these FAQs to learn how to manage your Stripe express account.
We send payouts on the first ten days of every month for the previous month’s revenues as long as your earnings balance is greater than $30.
Revenue Shares
The table below outlines how cgcircuit splits the revenues for every sale and subscription plan.
Traditional sale (A-la-carte sales)
Creator's promoted sale
96%
Content Creators have the option to generate a special link to promote their content. When a user reaches CGCircuit using this link and purchase the content within 1 week, the content creator gets 96% of that sale. (Does not apply to Workshops or Volume Purchases)
Organic Purchase
70%
When a user organically finds the content creator’s content and makes a purchase, the creator takes 70% of that sale. (Does not apply to Workshops or Volume Purchases)
Workshops
(including Unguided)
60%
Workshops are usually priced higher and CGCircuit heavily promotes the course via paid advertisement. For this reason instructors take 60%.
Volume Purchases*
50%*
CGCircuit handles the communication with studios and schools and ensures the security of the content creator’s videos by processing the video and add a watermark with the studio (or school) info. CGCircuit will also handle any legal cost attributes to the company (or school) not abiding to the Volume Purchase purchase agreement.
CGCircuit for Teams (Tutorials Only)
Subscription Plan
50%**
Revenues will be distributed to content creators based on viewership.
Formula: S = SP * V * P
S = creator shares
V = viewership (if your content has been watched 30% of the time during the period, then your viewership is 30%)
P = percentage share for content creator
SP = total subscription payment (for period)
Example:
V= 30%
P = 50%
SP = $100,000.00
S = $100,000.00 * 30% * 50%
Content Creator receives $15.000
*Content Creators who have published any content on CGCircuit before February 13th 2018, can consider Volume Purchases as regular sales, so for these content creators if the sales happens organically the shares will be 70%, and if it happens through the content creator’s promotion using the affiliation link, the content creator will get 96%.
** Please note: if your content was directly commissioned by CGCircuit, your revenue shares may differ from the ones you see in the table above. To all content creators who have published any content on CGCircuit before 05/01/2021, the shares will be 70%.
Content creator's tools
After publishing their content, creators have many tools at their disposal to track and promote it.
Sales Page
From the sale page, content creators can track how much sales they have made, and by whom. The sales page also gives other important info for instance what content is your best seller and more.
Google Analytics
Just enter your Google Analytic id in your CGCircuit account and keep track of what happens to all of your content and your profile page.
Public Profile
The profile page is highly customizable and it’s the page where Content Creators can showcase their personal work. From the profile page, users will be able to request tutorial topics from the content creator.
Affiliate link
Content Creatorsare able to generate an affiliation for any of their content. Content Creators will make up to 96% of every sale coming from their affiliate links.
Email users
Content Creators can send announcement emails to all users who have purchased their content. If an announcement needs to be more specific and be sent only to the users who purchases a specific content, the content creator has that option as well.
Gifting
Content Creators have the options to gift any of their content to anybody they want. The recipient will receive a “Gift of knowledge” email to announce them they received your gift.
Bundles
When creating more than 1 tutorial, Content Creators have the option to create Bundles by selecting any of their content and choose a new (discounted) price.
Volume Purchases (Tutorials Only)
How it works
Volume Purchases are currently only available for schools and studios.
A volume purchase allows studios and schools (institutions) to purchase multiple licenses of a given content (a minimum of 5) in order to share it with their employees or students without breaking the CGCircuit User Agreement.
The great thing about volume purchases is that schools and studios will be able to download the original videos for offline use.
This feature must be turned on by the content creator of the content, so if you don’t see the option to purchase multiple licenses, please contact the content creator by leaving a note in the discussion forum of the content. When the feature is turned on, institutions can pick the number of licenses they want to purchase and then they can finish the transaction. After that, the content is available to stream, but the institution must agree to share it with a maximum number of people that matches the number of licenses purchased.
Within 48 hours from the purchase, the institution will receive an email with the instructions of how to download the videos for offline viewing. These videos are watermarked with the email and the name of the institution as well as the first and last name of its main contact. The watermark are visible but not distracting.
Purchase Agreement
By purchasing multiple licenses of a content, the school or company purchasing, agrees to share their CGCircuit account and the provided watermarked videos with a maximum number of people that does not exceed the number of licenses purchased.
The school or company also agrees to provide a real contact information (First name, Last name, email address and name of the company) to CGCircuit in order to complete the creation of the watermark to be used on the videos to be delivered to the school or company.
What it means for the content creators
Content Creators must turn this option on to benefit from volume purchases. Content Creators also has the option to choose the minimum number of licenses a company can purchase and the amount of discount to apply to the content. For volume purchases, Content Creator’s revenue shares may vary, for more info go here
Creating Tutorials
If you have never done any video tutorials before, the following list will help you at least getting a better understanding of what’s involved.
- Plan: This is a very important step, but sometimes overlooked. Make sure to create an outline of what you want to cover in your tutorial. You can also use our syllabus to get you started.
- Gather your tools: You will need some recording tool and a good microphone. You can read this section to know more about this.
- Record: Some people just start recording as they work. Some other people like to write a script for themselves so they don’t pause too much during the recording. Find what approach work best for you.
- Edit: Regardless of your choice of recording, there should always be some editing afterwards. This way you can remove dead moments in the recording, or maybe correct some mistakes, or speed up the very slow moments.
- Create images: Now that you have your final videos, you should have a good source of material for creating the poster. Also try and collect as many great images as possible and upload them during the course creation process.
- Create a trailer: Create a promotional video for your tutorial. This is the video that we will use in promoting your tutorial.
- Payment setup: Please ensure you setup your account to receive payments from CGCircuit. You can follow instructions here
- CGCircuit Profile: The last thing to do is to make sure your profile on CGCircuit is up to date. Make sure your bio contains information that will help your content sell better. For examle where you worked and what high profile projects you worked on (if any).
- Publish your content: Now you can publish your tutorial! We will review it to give you some recommendations.
What you are going to need
Digital Tutorials:
These types of lessons are usually created by using a camcorder for filming the Instructor performing his/her artistic techniques.
You will need:
- A screen capture software. We recommend Techsmith Camtasia, but there are also other free solutions like Camstudio
- A good quality microphone. We recommend using a USB headset with microphone. Most of our users use the headset from Plantronics.
- A computer that can get to a screen resolution of at least 1280 x 1024
- A valid license of the software you use in your lesson
Traditional Tutorials:
These types of lessons are usually created by recording the screen, using a screen capture software. The following is a list of what you need to have before you start creating the content:
- A camcorder capable of recording video of at least 1280×720 (720p) pixel in resolution.
- A set of lights to make sure the video quality is good (recommended)
- A computer that can get to a screen resolution of at least 1280 x 1024
- An editing software like Premiere or iMovie (recommended)
Video and Audio Settings
Video Settings:
Codec
H.264
We recommend the H.264 codes (or MP4) for video and the AAC codec for Audio
Frame Rate
30fps
We recommend 30fps (frames per second) especially for those lessons that show motion (for example a bouncing ball). Having the frame rate set at 30 allows to show all the nuances that your lesson might have, for example the timing of an animation.
Data Rate
1600 kbits/sec (HD)
This is a very important setting to understand. It will make a big difference in the quality and the disk size of your lesson. We recommend 3200 kbits per second.
Resolution
1920x1080 (HD)
We highly recommend recording a lesson in 1080p HD (1920×1080). If the software you are using to record the video allows you, make sure to choose “square pixels” ratio.
Video Settings:
Codec
AAC
This is a very important setting to understand. It will make a big difference in the quality and the disk size of your lesson. We recommend 3200 kbits per second.
Sample Rate
340 kbps / 44.100 kHz
We highly recommend recording a lesson in 1080p HD (1920×1080). If the software you are using to record the video allows you, make sure to choose “square pixels” ratio.
Poster
Thumbnail:
The thumbnail is used accross the site to present your content to the public, so it’s very important that the thumbnail (as the banner) is a strong and appealing image.
The image below might help you start the design of your thumbnail.
The thumbnail must be a minimum of 500×290, but we recommend the resolution of 1024×594

You can download the photoshop file here.
Planning
If you decided to start your new teaching adventure and create a course to post on CGCircuit, this is a good checklist to always refer to. It might seem overwhelming at first, but it’s actually very easy and it will become second nature for you almost instantly.
- Think of a subject to teach if you didn’t already.
- Do a little research and see what’s out there covering the same subject you want to create.
- Ask yourself how you can make it different. Remember you should not just create a course to teach about some specific concepts, but your approach to those concepts.
- Write down all the concepts you want to cover in a simple outline.
- Download the CGCircuit Course Syllabus template and start filling it out.
- If necessary write a little script that you can refer to when you are recording. For example definitions, formulas, historical dates etc.
- Think about how you can organize the course on disk. If you want you can use our template.
- Plan how you can create example files. People absolutely love to check out the files you used to better follow your course. For for info, go to our creating example files section.
Structure sample of a Tutorial
In the following example, we try to generalize a structure of a course. Whether you are making a small tutorial or an extensive course, regardless of the subject, using this structure gives you an excellent starting point.
Remember that you can choose to modify this structure as you want, but by following this structure, your course will have a much better chance to be watched or sold.
| Part 1 | Part 2 | Part 3 | Part 4 | Part 5 | Part 6 |
|---|---|---|---|---|---|
| Intro | Theory and Tools | First Steps | Final Steps | Polish Steps (if any) | Conslusion |
Part 1: Introduction
Video 1: Talk about what you are going to cover in your course, showing the final result. Keep this video under 1 minute long.
Video 2: Talk about Example files if you have any. check the section on example files to learn more.
Video 3: Talk about what the viewer needs to know before they start watching your course.
Part 2: Theory and Tools
Video 1: Analyze what you are going to talk about and identify the main tools you are going to use.
Video 2: Briefly talk about the first main tool you are going to use. This can be as quick as showing your technique of how to hold a pencil to talking about a Maya Editor or a Nuke node. Remember these videos should be quick and just describe what the tools do.
Part 3: First Steps
Here you can start showing the meat of your course and start the project. Explain why you start the way you do and keep explaining the reasons behind your artistic or technical decisions. Keep videos in this chapter short (no longer than 7 to 10 minutes). This chapter should contain between 3 and 10 videos depending on the subject.
Part 4: Final Steps
Same as the First steps, here you can conclude your project by guiding the users through the final stages. Remember to keep explaining the reasons behind your decisions even if to you they might be obvious.
This part should be made of 3 to 10 videos depending on the subject.
Part 5: Polish Steps
At this point you should be done with the project you showcased in your course, so in this part you can talk about how you can make it even better without showing it unless you want to.
Also keep explaining the reasons behind your decisions.
Part 6: Conclusions
Video 1: Give viewers a rundown of what they have learned in the course and what they should do to practice more.
Video 2: Give viewers a list of Resources that you use to help you with the subject you just covered.
Video 3: List any references and thank any people who might have helped you with the creation of the course.
Tips:
- Remember to keep your videos nice and short so they are more digestible. For more info on recording visit our record your course section.
- Create a 1 minute introduction of your course briefly going over the subjects you talk about.
Promoting your content
Start before you finish your tutorial
When you decide to create a course on Cgcircuit, you should start to let people know. Go on the forums where people know you and on Facebook, LinkedIn, Twitter and Google+ and announce that you are about to publish this course.
Let people start talking about it.
Keep people informed on your progress
Now that people know about your course, keep them informed on your progress, this way they stay interested. Also ask always for suggestions. People like to feel involved.
Tell the world your course is available
Go back to all the forums and social media conversations about your course and post an announcement there as well.
Ask 10 close colleagues to spread the word on their social media circles.
Badge System
Generate your badge
You can generate a special link in the form of URL or a customizable button. Use the url or the button (aka the Badge) on your site or anywhere you want to advertise your tutorial/s.
Keep 96% of your sales
When a user clicks on your badge, and ends up buying your tutorial, you will make 96% of that transaction. When a user clicks on your badge and gets redirected to CGCircuit, the system will remember for a week that the user clicked on your badge, so if he or she comes back to CGCircuit directly within that week, you will still get 96% of the sale.
Creating Digital Assets
If you’re a new creator on CGCircuit, your products will be reviewed by our team before they can be published. However, once you have successfully submitted and passed the initial review, subsequent submissions will be immediately published without any delays.
To ensure that your account is set up properly and to guarantee the highest level of quality for your content, we have provided some essential guidelines for you to follow. These guidelines will also help expedite the review process for your first submission.
By following these guidelines, you can ensure that your creations meet the standards expected by the users of our platform. This will increase the chances of your content being well-received and valued by the audience.
Store Information
Once you have registered, you can set up your account as a seller by adding all the necessary information. This will help you build credibility and trust with potential buyers.
Required info:
- Choose User Type.
- Provide a real name and last name (sometimes users enter fictitious names).
- Upload your real photo or a logo if you’re a company.
- Set up your account to get paid. Check this section (Getting Paid).
- Fill out the “Biography” section with information about yourself or your company. Users will buy with more confidence.
- Allow emails. Keeping it on is not mandatory, but it is strongly recommended. We will keep your email address private for privacy reasons.
There are a few more details you can add to your Store, including:
- Video and images incorporated to your personal page (Tab demo and images).
- If any, your personal webpage ( avoiding links to other stores).
- Link to your social channels.
Providing more information will help users feel more confident about your products.
Product Presentation
A clear and detailed presentation of your digital asset is key, so here are some things to keep in mind when you create your digital asset.
Assets must feature:
- 1 Poster (search image)
- At least 4- 5 beauty shots Images
- 1 Wireframe
- 1 360° Turntable Image.
These images should be distinct and representative of the model being sold. Repeating the same image more times or including irrelevant images won’t give customers a proper understanding of the model’s appearance and suitability for their needs. Inadequate imagery may decrease the likelihood of a sale.
Enhance your presentation by including one or several Youtube/Vimeo videos to showcase your model/asset in a rendered scene or simply make a tutorial on how to use it.
Digital Asset Poster
Posters are the first thing the customer will see. It’s their first impression. Uploading a good poster can make the difference between whether a customer clicks on your product or not, so it’s crucial to make it stand out.
We would like to keep pages clean, so the poster should only have these features:
- Close-up or mid-shot of your product
- A nice, clean render
- Clearly shows what you’re selling
- Use a maximum of 2-3 overlayed logos
Description
As a 3D artist, your digital assets are an extension of your creative vision and hard work. By taking the time to write a comprehensive description, you can not only set the expectations of your customers but also build their confidence in your product. A well-written description can make all the difference in ensuring a positive customer experience and making your assets stand out in a crowded market.
Here are a few key elements to include in your asset description:
- Features and Capabilities: Clearly outline the features and capabilities of the asset, helping your customers understand exactly what they are purchasing.
- Technical Details: Provide the technical details of the asset, such as the file format (e.g. FBX, OBJ, etc.), polygon count, vertex count, texture resolution, and any other relevant technical specifications. It is also helpful to mention system requirements. This information is critical for customers to understand the performance and functionality of the asset.
- Compatibility: Mention the compatibility of the asset with various 3D software programs, ensuring your customers know if it will work for their specific needs.
- Additional Information: Include any additional information that might be useful for your customers, such as tutorials or support resources.
By writing a detailed and informative description, you can set yourself apart from other creators and give your customers the confidence they need to make a purchase. So take the time to write a description that accurately represents your digital assets and showcases your talent and dedication as a 3D artist.
Bundles
Sell bundles
On CGCircuit you can bundle your content and sell it for a different price of your choice. It’s a great way to add new content to your library and generate noise about you and your tutorials.
Discount to reward your users
When you create a bundle, you can think of lowering the price, so people are more likely to buy more tutorials.
Discord (Creators)
If you haven’t used Discord before, it’s a comprehensive voice and text chat application enabling you and your customers (or fellow creators) to establish and nurture the community you envision. Engaging with your audience is vital for growth and success. It’s important to understand their preferences, opinions, and suggestions, as this will greatly contribute to your ongoing improvement.
This allows you to:
- Strengthen the connection
- Refine your content
- Cater more effectively to their needs & interests
- Get more value for your products.
Article Quick links
Getting started with Discord
As a content creator, you have two options for using Discord on CGCircuit.
- Create your personal channel on CGCircuit’s Discord server.
- If you already own a Discord Server, you can link the invitation to your personal Server.
Users will be able to access your Discord from your content pages in both cases, depending on your choice.
Create your channel on the CGCircuit Discord Server
You will find the Discord feature during the product publishing process.
Enabling this button will give us permission to create your own channel on CGCircuit’s Discord server, and the invite icon link will appear on the product page once published.
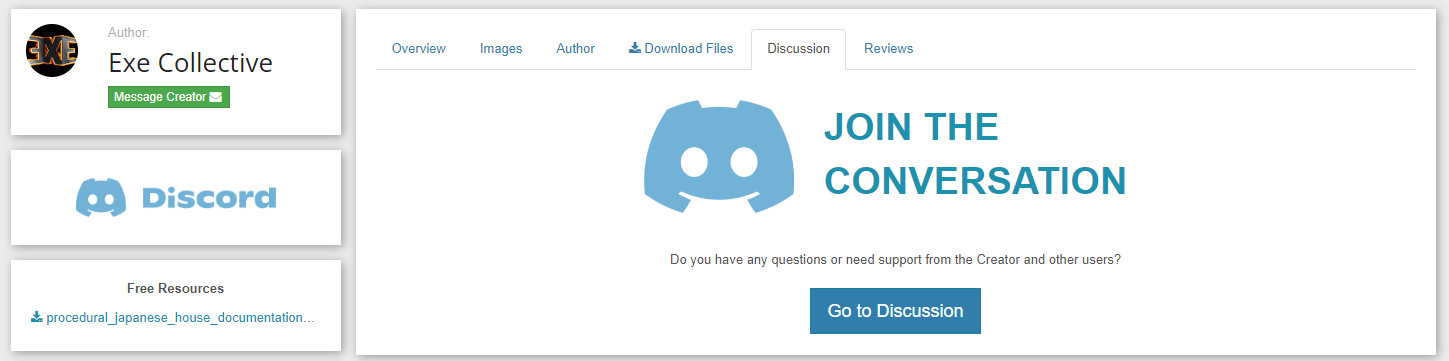
Link my Discord account to the CGCircuit product page
You can add an invite to your Discord Server during the product publishing.
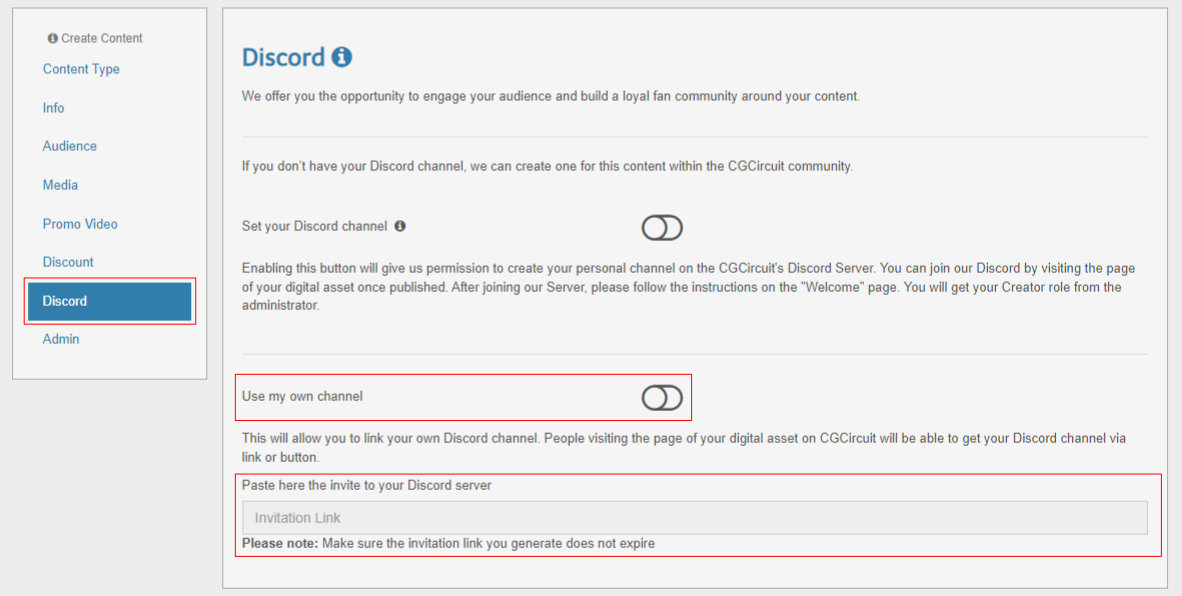
This button will allow you to add the invite URL to your Discord server. The invite link will appear on the product page once published.
Getting access to your CGCircuit Discord channel
For the first access, click the Discord icon link on your published product page and follow these steps:
Sign in or create an account:
If you’re not already signed in to your Discord account, you’ll be prompted to sign in or create a new account. If you don’t have an account yet, click “Register” and follow the instructions to create one. If you already have an account, sign in with your email and password.
Join the server:
After signing in or creating an account, you’ll see a screen with the CGCircuit server’s name and an option to join. Click the “Join Server” button to accept the invitation and access the server.
Access the server:
Once you’ve joined the server, click on the CGCircuit icon on the left side of the Discord app or website to access its channels.
Locate and manage your channel:
You are on the Welcome page. Carefully read the information here as it guides you through the initial setup.
Navigate to the #🤝rules channel and review the server rules.
To accept and acknowledge these rules, find the reaction button at the bottom of the page and click it. This action will reveal a new channel, #🔐get-a-role, in your channel list. Click on it.
Getting a “CGCircuit user” role
Locate the “CGCircuit user” icon and click on it to access all channels.
(Important) Change your nickname
Change your nickname on this server to match your CGCircuit profile by right-clicking your username, choosing “Edit Server Profile” and entering the correct name.
You don’t know how to do it? Follow the instructions here.
Once you complete these steps, an administrator will create your channel, giving you the Creator role with administrator permissions.
FAQ
I purchased a course, do I have limited time to watch it?
If you purchased a course, you have access to it for as long as you have an account on CGCircuit. Also there is no limit to the amount of times you can watch a course.
Do courses expire?
Courses do not expire. Once you’ve purchased a course it’s yours to watch indefinitely for as long as you want and as many times as you feel like. Should an instructor plan on removing one course because no longer up to date, it will become unavailable for anyone to buy or subscribe to, but users who purchased it, will still be able to access it.
I deleted a course from the list of my purchases, how can I retrieve it?
When you remove a content from your list, you can still access it by looking at your archived courses. When deleted from the archive, you will need to purchase it again. (don’t delete it!).
Can I download a video and watch it offline?
Currently the only way to download videos for offline watching is to make a Volume Purchase which it is only available for Companies and Schools. Single users can’t download video for offline use at this time.
How much will I get paid when my course sells?
Please refer to the Revenue Shares table.
When will I get paid?
Authors will receive their revenues during the first week of every month.
Who owns the rights to a course?
Instructors own the rights of their content and if they can decide to post their lesson somewhere else if they want. However CGCircuit reserves all rights for any decision to cease or suspend such lesson. CGCircuit has the right to use the user’s name and images of their lesson(s) for marketing or PR purposes of the CGCircuit website and/or the user’s lesson(s).
Can I get in touch with content creators?
Although an instructor is not required to stay in touch with students, we hope to build a community where knowledge is exchanged even after a given lesson is viewed, and so we encourage everyone to connect and stay in touch with instructors using the means provided by CGCircuit like messaging system. Always being mindful of the hetiquette guidelines.
How does the content approval process work?
We believe that in order to have a healthy community, we should let the user decide the quality of a lesson. CGCircuit provides ways to give feedback about a given lesson using the star rating system. A lesson can also be flagged if believed to be not worthy of being online. When a lesson is flagged CGCircuit will investigate the nature of the flag and will decide to remove the lesson from the site or not.